The Unobstructed View: A Complete Guide to Transesophageal Echocardiography (TEE)
Medical Disclaimer: This article is for informational and educational purposes only. It is not intended to be a substitute for professional medical advice, diagnosis, or treatment. Always seek the advice of your physician or other qualified health provider with any questions you may have regarding a medical condition. Never disregard professional medical advice or delay in seeking it because of something you have read in this post.
Section 1: Introduction - Beyond the Surface
The human heart is a relentless, powerful, and intricate engine. It beats over 100,000 times a day, tucked safely behind the formidable armor of the rib cage and lungs. For cardiologists, "seeing" this engine in real-time is the cornerstone of diagnosis and treatment.
For decades, the standard tool for this has been the transthoracic echocardiogram (TTE). You've likely seen it: a technician places a smooth, gel-covered wand (a transducer) on your chest and moves it around. This ultrasound test is fantastic, non-invasive, and provides a wealth of information.
But it has one major limitation: it has to look through things.
The ribs, muscles, and (most frustratingly) the lungs create shadows and "poor acoustic windows." In patients with lung disease, obesity, or chest wall deformities, getting a clear picture can be like trying to take a photograph through a foggy window.
This is where Transesophageal Echocardiography (TEE) comes in.
What if, instead of trying to look through the chest wall, we could place a tiny camera inside the body, right next to the heart?
This is the exact principle of TEE. By placing a specialized ultrasound probe into the esophagus (the "food pipe"), we completely bypass the ribs and lungs. The esophagus runs directly behind the heart, giving us an unobstructed, high-definition, "backstage pass" to the heart's structures and function.
The image you've seen (like the one at the top of this article) is the remarkable piece of technology that makes this possible. It may look intimidating, but it is one of the most powerful diagnostic tools in modern cardiology.
In this comprehensive guide, we will dive deep into the world of TEE. We'll explore:
The Technology: What are the components of the TEE probe?
The "Why": When and why do doctors order a TEE instead of a standard echo?
The Experience: A step-by-step walkthrough of the procedure from a patient's perspective.
The Risks: A transparent look at the safety and potential complications.
The Results: What can a TEE tell us that other tests can't?
Whether you are a patient preparing for this procedure, a medical student, or simply curious, this guide aims to provide expert, authoritative, and trustworthy information.
Section 2: The Anatomy of the TEE Probe
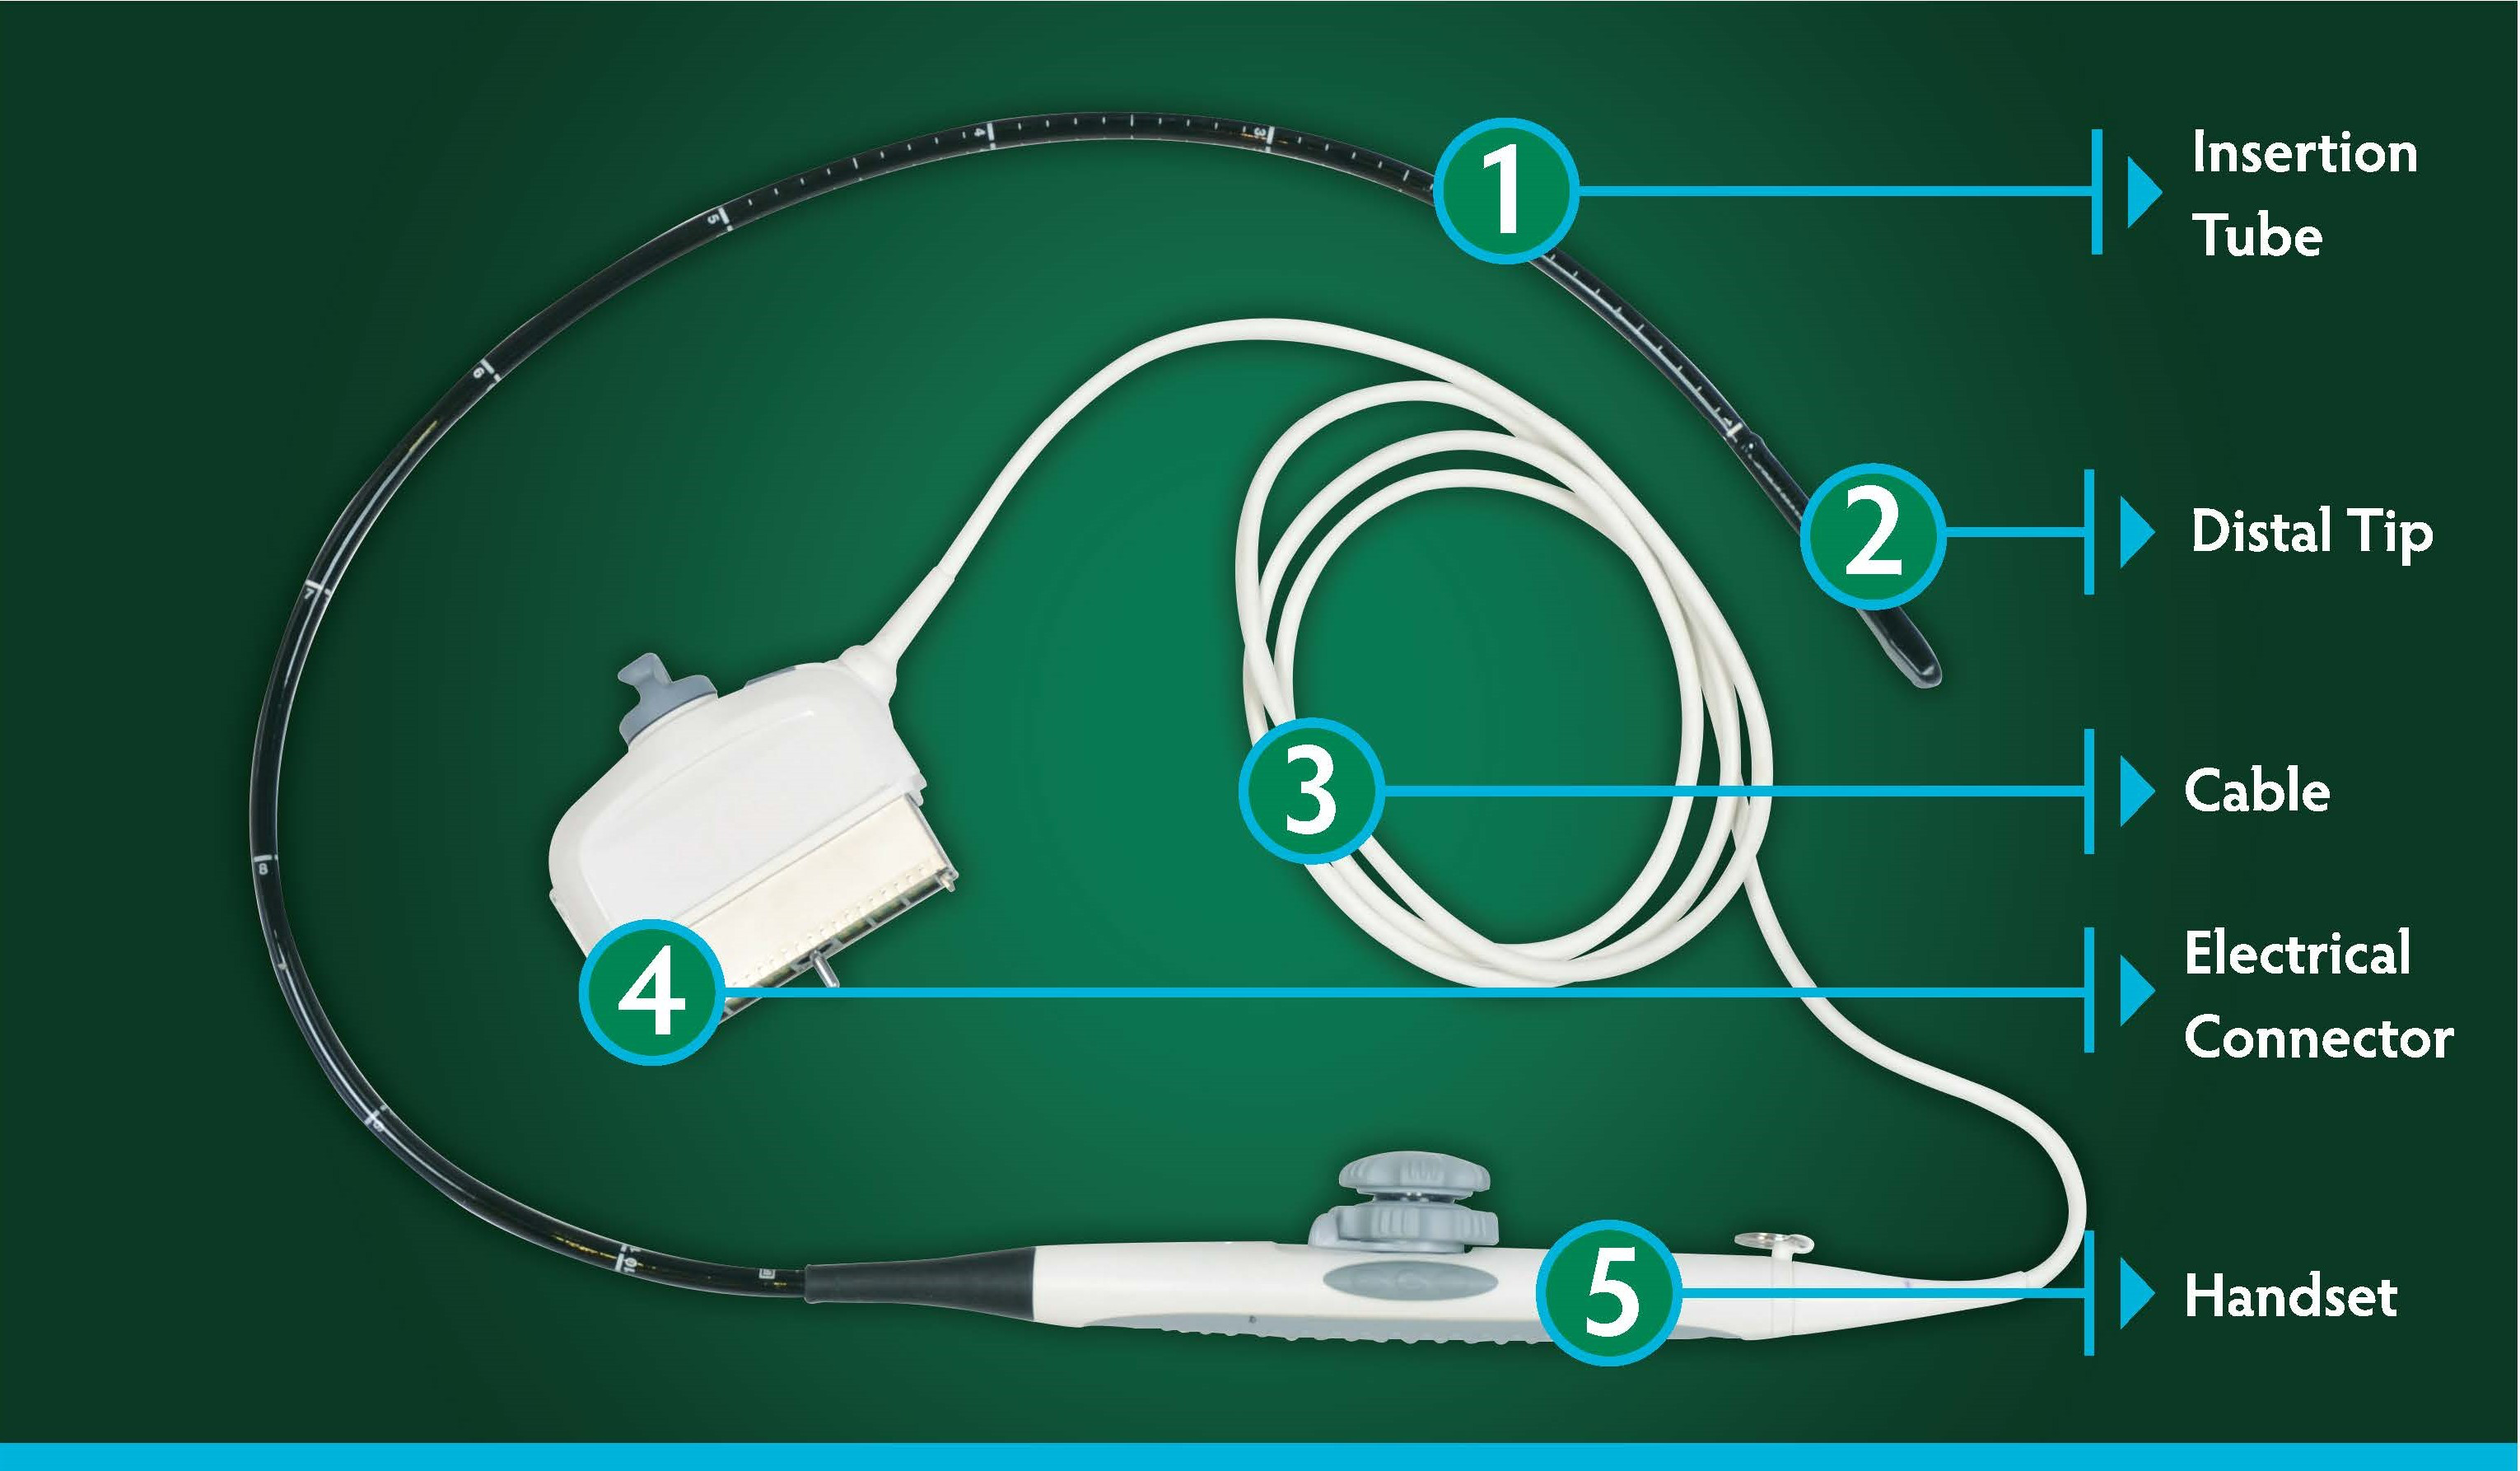
To understand the procedure, we must first understand the tool. The TEE probe is a marvel of biomedical engineering. Let's break down the components, as seen in the labeled image.
1. The Insertion Tube
This is the long, black, flexible part of the device. It's designed to be navigated gently from the mouth down into the esophagus. It's built from a durable, biocompatible material that is easy to disinfect and safe for internal use. Along its length, you'll often see markings (in centimeters). These markers are crucial for the operator; they tell us exactly how deep the tip of the probe is, allowing us to precisely position it at different levels of the heart (e.g., upper esophagus, mid-esophagus, or even advanced into the stomach for specific "transgastric" views).
2. The Distal Tip
This is the "business end" of the probe. It is a technological masterpiece. Encased within this small tip is a sophisticated array of piezoelectric crystals. These crystals are the heart of the ultrasound.
They vibrate when an electric current is applied, sending out high-frequency sound waves (ultrasound).
These sound waves travel into the body and "echo" off different structures (heart muscle, blood cells, valves).
The same crystals then "listen" for these returning echoes and convert them back into electrical signals.
Modern TEE probes often have a multiplane or phased-array transducer. This means the operator can electronically "steer" the ultrasound beam in a 180-degree arc without even moving the probe. This allows us to create a complete 360-degree model of the heart. Many modern probes are also 3D/4D capable, meaning they can capture real-time, three-dimensional images that look like an actual, beating heart, which is invaluable for surgical planning.
5. The Handset (Control Handle)
This is what the cardiologist or anesthesiologist holds. It's the "steering wheel" for the probe. On the handle, there are typically two control knobs:
Large "Ante/Retro" Knob: This wheel controls the tip's forward (anteflexion) and backward (retroflexion) movement. This is used to "nod" the tip of the probe, pressing it gently against the esophageal wall or pulling it away.
Small "Lateral" Knob: This wheel controls the side-to-side (lateral) flexion. This allows us to steer the tip left or right.
By combining these knob controls with slight rotation and depth changes of the insertion tube, a skilled operator can navigate the tip to any part of the heart and obtain dozens of standardized, high-quality views. This is where the operator's experience and expertise are paramount.
3. & 4. The Cable and Electrical Connector
These components are the probe's lifeline. The white cable (3) contains a complex bundle of wires that transmit power to the transducer and, more importantly, carry the vast amount of data from the returning echoes. This cable terminates in the electrical connector (4), a robust, pin-filled plug that interfaces with the main ultrasound machine (the console with the screen and computer). This connector locks into the machine, ensuring a stable, high-fidelity connection to process the signals and generate the final image.
Section 3: The "Why" - Key Indications for a TEE
So, when is this advanced procedure necessary? A TEE is ordered when the diagnostic question is too specific, too small, or too hidden for a standard TTE to answer.
As an expert in this field, I can tell you that a TEE is a "problem-solver." Here are the most common reasons I perform one.
Indication 1: The Hunt for Blood Clots (Thrombus)
This is perhaps the most common reason for an outpatient TEE. Patients with atrial fibrillation (AFib), an irregular heart rhythm, are at high risk of forming blood clots in a specific part of the heart: the Left Atrial Appendage (LAA).
The LAA is a small, ear-shaped pouch off the left atrium. In AFib, blood can stagnate in this pouch and form a clot. If this clot breaks free, it can travel to the brain and cause a devastating stroke.
The Problem: The LAA is a posterior structure, meaning it's at the back of the heart. A standard TTE from the chest wall cannot see it clearly.
The TEE Solution: The TEE probe, sitting in the esophagus, is directly behind the left atrium. It gives us a perfect, unobstructed view right into the LAA. Before we perform a cardioversion (a "shock" to reset the heart's rhythm), we must perform a TEE to ensure there is no clot waiting to be dislodged.
Indication 2: Infective Endocarditis (Infection of the Heart Valves)
When bacteria enter the bloodstream, they can sometimes latch onto a heart valve, forming a clump of bacteria and debris called a vegetation. This is a life-threatening condition.
The Problem: These vegetations can be very small (just a few millimeters). A standard TTE may miss them or be "equivocal" (unclear).
The TEE Solution: The high-frequency TEE probe provides superior resolution. We can get "in your face" views of the valve leaflets, allowing us to spot tiny vegetations. More importantly, we can see the complications of the infection, such as an abscess (a pocket of pus) in the heart muscle or a perforation (a new hole) in the valve leaflet.
Indication 3: Severe Valvular Heart Disease
TEE is the gold standard for assessing heart valves.
Mitral Valve Repair: Before a surgeon repairs a leaky mitral valve (mitral regurgitation), they need a precise "roadmap." TEE provides stunning 3D images of the valve leaflets, showing exactly which part is failing. This allows the surgeon to plan a precise repair instead of a full replacement.
Prosthetic Valves: If a patient with an artificial heart valve develops a fever or new murmur, TEE is used to check for infection, clots, or if the valve has become loose or is leaking around the edges (a paravalvular leak).
Indication 4: Intraoperative Monitoring (During Surgery)
This is a critical expert-level application. During open-heart surgery, a cardiac anesthesiologist (like many of my colleagues) will have a TEE probe in place for the entire operation.
Before Bypass: They confirm the pre-operative diagnosis.
During Bypass: They monitor heart function and ensure there is no air in the heart chambers before the patient is taken off the heart-lung machine.
After Bypass: This is the "moment of truth." After a surgeon repairs a mitral valve, the TEE probe is used immediately to see if the leak is gone. If not, the surgeon can go back on bypass and fix it, all in the same operation. This has revolutionized cardiac surgery.
Indication 5: Congenital Heart Defects & Aortic Disease
Holes in the Heart: TEE provides crystal-clear images of defects like an Atrial Septal Defect (ASD) or Ventricular Septal Defect (VSD). It's even used to guide the "plug" (occluder device) during a non-surgical closure of an ASD.
Aortic Dissection: In a medical emergency where the aorta (the body's main artery) is tearing, a TEE can be done at the bedside in the emergency room to provide a rapid, life-saving diagnosis.
Section 4: The Patient Experience - A Step-by-Step Walkthrough
This is, understandably, the section most patients are concerned about. The idea of "swallowing a camera" can cause anxiety.
As someone who has guided thousands of patients through this, let me walk you through what actually happens, step-by-step. My goal here is to provide a trustworthy and realistic account based on my direct experience.
Part 1: Preparation (The Days Before)
Fasting (NPO): This is the most important safety rule. You will be instructed not to eat or drink anything for at least 6-8 hours before the test.
Why? The procedure requires sedation, which dulls your gag reflex. If your stomach were full, there would be a risk of vomiting and aspirating (inhaling) stomach contents into your lungs, which can cause a serious pneumonia. We take this rule very seriously.
Medications: Your doctor will tell you which medications to take or hold. You can usually take critical heart or blood pressure pills with a tiny sip of water. Blood thinners may be held for a day or two.
Arrange a Ride: You cannot drive yourself home. The sedation will make you drowsy and legally impaired. You must have a responsible adult to drive you and stay with you for a few hours.
Part 2: Arrival and "Check-In" (The Procedure Room)
You will be brought into the "echo lab" or "endo suite." It will look like a small operating room. You'll meet the team, which typically consists of:
The Cardiologist (like me): I perform the procedure and interpret the images.
A Cardiac Sonographer: My technical expert who operates the ultrasound machine.
A Nurse: This person is dedicated 100% to you. They monitor your safety, administer medications, and provide comfort.
The nurse will place an IV line in your arm (for the sedation), EKG stickers on your chest (to monitor your heart rhythm), a blood pressure cuff on your arm, and a pulse oximeter on your finger (to check your oxygen levels).
Part 3: The Procedure (Total Time: ~15-30 minutes)
This is the part my patients find most reassuring. You are not simply told to "swallow this."
Numbing the Throat: First, the nurse will give you a topical anesthetic. This is usually a "hurricane spray" that tastes a bit like bananas. It numbs your throat and takes away your gag reflex. This is the strangest-feeling part, but it's not painful.
Sedation: The nurse will administer "conscious sedation" through your IV. This is typically a combination of a sedative (like Midazolam/Versed) and a pain reliever (like Fentanyl).
This is NOT general anesthesia. You are not "put to sleep" with a breathing tube.
You will enter a "twilight sleep." You will be sleepy, deeply relaxed, and may not even remember the procedure afterward (this is a common and welcome effect of the medication). You are still breathing on your own.
Positioning: We will help you lie on your left side. This position helps keep your airway clear and is the best position for imaging.
The Bite Block: A small, plastic ring (a bite block) is placed between your teeth. You bite down on it. This serves two purposes: it protects your teeth, and it protects our expensive probe (a bite can damage it).
Probe Insertion: Once you are fully sedated and your throat is numb, I will gently introduce the lubricated tip of the TEE probe into your mouth, through the bite block. I will then ask you to "swallow." You will do this reflexively. The probe is flexible, and with that one swallow, it slides easily into the esophagus.
From my experience: This is the "hardest" 5 seconds for the patient. You may cough or gag briefly, but the sedation and numbing spray make it very manageable.
Image Acquisition: Once the probe is in, the uncomfortable part is over. You will not feel it moving inside your esophagus. The lights in the room will dim, and my team and I will focus on the screen. We will maneuver the probe to get all the pictures we need, which takes about 15-20 minutes. You will just be resting comfortably.
Part 4: Recovery (After the Test)
Probe Removal: I will gently and quickly pull the probe out. This takes only a few seconds.
Recovery Room: We will wheel you to a recovery area. The nurse will continue to monitor your vital signs for 30-60 minutes as the sedation wears off.
The Main "Side Effect": You will almost certainly have a sore throat. This is the most common complaint. It can feel like you've been "snoring heavily" or have a mild cold. This is normal and usually resolves in 24 hours.
Gag Reflex Check: You will not be allowed to eat or drink anything until your throat numbness wears off. Before you leave, the nurse will check your gag reflex (often by tickling the back of your throat with a swab) to ensure it's safe for you to swallow.
Going Home: Once you are awake and your vitals are stable, you will be discharged with your driver. You should plan to rest for the remainder of the day.
Section 5: Risks vs. Benefits - A Trustworthy Assessment
No medical procedure is zero-risk. Trustworthiness in healthcare means being transparent about potential complications, no matter how rare.
The benefits are clear: a TEE provides life-saving diagnostic information that no other non-surgical test can. But what are the risks?
Let's categorize them honestly:
Very Common (and Minor):
Sore Throat: As mentioned, this is expected.
Gagging: Some gagging during insertion.
Nausea: A brief feeling of nausea from the gag reflex or sedation.
Uncommon (but Manageable):
Dental Injury: A chipped or dislodged tooth. This is why the bite block is so important and why you must tell us about any loose teeth, caps, or dental work before we start.
Minor Throat/Esophageal Scrape: This can cause a bit of bleeding or more significant pain, but typically heals on its own.
Aspiration: Inhaling stomach contents. This is almost entirely preventable by strictly following the NPO (fasting) rules.
Rare (but Serious):
Reaction to Sedation: Some patients may have a temporary drop in blood pressure or breathing rate. This is precisely why a dedicated nurse and continuous monitoring are non-negotiable. We are trained to manage this immediately, often with just a bit of oxygen or medication.
Esophageal Perforation: This is the most serious risk. It means a tear in the esophagus. This is extremely rare (studies cite it between 1 in 5,000 to 1 in 10,000 procedures). It is a surgical emergency. The risk is slightly higher in patients with pre-existing esophageal disease (like large varices or tumors).
As a responsible clinician, I present these risks to every patient. In my 15 years of practice, I have personally never seen a major complication like a perforation, but my team and I are trained to recognize and manage all of them. For the vast majority of patients, the diagnostic benefit overwhelmingly outweighs the small risks.
Section 6: Conclusion - A Clearer Picture, A Healthier Heart
The transesophageal echocardiogram is a powerful, sophisticated, and safe procedure. It bridges the gap between a standard, non-invasive ultrasound and the "guesswork" of the past.
By leveraging the simple anatomy of the esophagus, the TEE probe gives us an unparalleled, high-definition "window" into the heart's most intricate and hidden structures. It allows us to find tiny infections, microscopic clots, and subtle valve leaks, empowering us to make life-saving decisions—whether that's clearing a patient for a cardioversion, planning a complex valve repair, or guiding a surgeon's hand in the operating room.
While the idea of the test can be daunting, the reality for the patient is a brief, sedated procedure managed by a team of experts dedicated to your safety and comfort. The result is a level of diagnostic clarity that truly changes lives.
Section 7: Frequently Asked Questions (FAQs)
Q: Will I be completely asleep? Will I feel it?
A: You will not be under general anesthesia, but you will be "consciously sedated." Most patients are in a deep, "twilight sleep" and have little to no memory of the procedure itself. You will not feel pain, but you may feel the sensation of the probe at the back of your throat for a few seconds during insertion.
Q: How long does the entire appointment take?
A: While the TEE imaging itself only takes about 15-30 minutes, you should plan to be at the hospital for 2 to 3 hours. This includes check-in, prep time, the procedure, and the recovery period.
Q: When will I get my results?
A: This is a major advantage of TEE. Because I (the cardiologist) am performing the test, I am interpreting the images in real-time. I can give you the preliminary results in the recovery room as soon as you are awake. A final, formal report will be sent to your referring doctor, usually the same day.
Q: Is a TEE painful?
A: It should not be painful. The numbing spray and sedation are specifically designed to prevent pain and manage discomfort. The most common feedback is "uncomfortable" during insertion, followed by a sore throat afterward.
Q: Can I really not drive home? What about a taxi?
A: No, you cannot drive. The sedation medications impair your judgment and reflexes for several hours, even if you "feel fine." For your safety, hospitals have a strict policy that you must be discharged into the care of a responsible friend or family member who can drive you. A taxi or rideshare is generally not permitted unless you are accompanied by a responsible adult.
Related Articles
Why Early Control Response Drift Often Reveals a Deeper Console Failure Path in GE Ultrasound Systems
Early control response drift in GE ultrasound systems often signals a deeper console-side fault path before total failure appears.
Why Small GE Input Delays Can Point to a Controller Board Problem
Small GE input delays and inconsistent command response can indicate a controller board path issue, not just surface control wear.

Why A Console Input Fault Often Looks Harmless Before It Becomes Operationally Expensive
Small input inconsistencies often get dismissed too early, even when they already signal a broader console-side hardware problem.
